The world of Digital Marketing is getting increasingly competitive, therefore, as an account manager it is even more crucial to be getting the most out of the accounts you oversee.
During the audits and the handover of different accounts, it is quite clear to see what distinguishes a good account manager from a great account manager. It is these boring 1% jobs that are often neglected, but in actual fact can have huge ramifications on the performance of the account.
Within this blog, I will take you through what I like to call the PPC Brilliant Basics. These are basic tasks than can take very little time, but often have a brilliant impact on performance. I will also provide you with little cheat codes you can take away and implement on your own accounts.
Search Terms
One of the most laborious and boring tasks a successful account manager will undertake is most likely assessing their search term report. So, what is a search term report?
Simply put, a search term is the word and/or phrase a person will enter in Google and one of your ads will be displayed. This is not to be confused with the keywords you have in your ad-groups.
By viewing the search term report, you can see what searches are triggering your ads. A great account manager will review these daily. (Although for smaller accounts it may be worthwhile viewing every 2-3 days).
If you have just launched a new campaign/ad-group, or are utilising DSA’s, it is even more important that you are constantly reviewing these search terms daily. Why? Well, we know that DSA’s is a highly automated function of Google (based on the landing page). As with majority of Google’s AI functions, this can lead to irrelevant queries coming through. The quicker you can spot these irrelevant queries, the less money you are going to waste. And this money can be re-invested into high intent searches that can bring in conversions.
It is especially important to check the search terms if you are using Broad match keywords. You may have some idea of what will trigger your ads (based on the keywords submitted) but nothing is definitive without data. And depending on the keywords, this may allow for other irrelevant searches to come through. For example, a local NHS GP surgery may have the keyword ‘GP’ in their account. This is a highly relevant keyword, but this may also trigger the search ‘British GP Start Time’ (Formula 1 race). This may not have been thought of at the time of building the campaign out but gives insight into terms that is needed to be excluded. (Please see the example below)

Furthermore, you can use this to exclude searches from a single ad-group to allow them to be channelled into a different ad-group within the same campaign, or even a different campaign. The best use for this is ensuring that Brand search terms are not coming through your non-brand campaigns. Or if you have a ‘Golf Vacation’ ad-group and a ‘Golf Package’ ad-group, you can exclude any ‘golf vacation’ search terms from the ‘Golf Package’ ad-group and allow it to come through the correct ad-group (see example below). This will allow for your ad to be shown on higher intent and relevant searches, so should increase CTR and Conversion rate.

You can also use the search term report to add new keywords into existing ad-groups. If you find that a search term is performing well (e.g., high conversions with low CPA) it is worth adding this to your campaign to allow for improvements in the campaign. You are already spending on the search terms so you might as well include them in your account to have greater control over them.
Cheat Codes
Depending on the size of the account, you could have thousands of search terms to review. When reviewing the search terms, it is very useful to apply filters, so it doesn’t become too overwhelming.
One filter I like to use is ‘Added/Excluded: None’ and ‘Cost > £0’. This means I am only seeing the search terms that haven’t been organised yet, and those that have spent. This can reduce the terms down to a more workable 10-20 terms. I can easily see the irrelevant terms that have spent and exclude where necessary.
Other useful filters are ‘0 conversions and > 5 clicks’. This shows the popular terms that don’t convert, hence easy to exclude the poor performing/irrelevant terms. ‘>50 impressions and CTR < 2%’ is also good to highlight those searches where people aren’t clicking onto the ad, highlighting that it isn’t relevant to them
Audiences
Audience segments are an essential aspect for a successful account. Simply, these are groups of people who share a common demographic and/or interest. A great account manager will utilise both 1st party and 3rd party data.
1st party data is the data you provide Google. This could be a customer list of recently converted or webpage views within the last 30 days as these are commonly used for remarketing. This can help to improve performance.
3rd party data is that provided by Google. This can include people’s interest (eg Sports Fans), what people are actively looking for (e.g. in market for Cooking Utensils) or even peoples demographics (e.g., Parents of young children). Using the 3rd party data can allow you to access those people who may not exactly know who you are but have shown an interest into similar products/services you are advertising.
By adding audience segments into your campaigns, this will allow your ads to be shown to people who are more likely to be in the market for your product/service. A successful account manager will utilise a healthy mixture of both 1st party data and 3rd party data to form all their audience segments. The aim is to 80% of the traffic coming through the audiences.
Remember the golden rule for audience segments! All audiences must have a minimum of 1,000 individuals.
Cheat Code
If the account has a Pmax running, instead of manually thinking about which audiences to add, look at the audiences your Pmax is matching to, and use this to inform which audiences to add into the search campaigns. Remember, Pmax is designed to get conversions so will target certain audiences that it knows will convert. Therefore, it is a good idea to ensure these audiences are also covered in your search campaigns.
Ad Copy
Ad copy is highly important within a Google Ads campaign as this is what the customer will see and hopefully click on. Ideally, you want all your ads rated ‘Excellent’, but not ‘Average’ or below.
To improve your ads score, all the headlines and descriptions must be maxed out, using some of the keywords you have within the ad-group. It is very important to fill all these headlines and descriptions in as it can provide more combinations for Google to use when showing the ads. By restricting this, it limits the performance of the ads. Maximising the headlines should then, in theory, lead to a greater CTR and in turn a greater Conversion Rate.
Additionally, make sure you have you display paths filled out and have relevant assets for these ads. This is a very common theme amongst account managers to not fill all of these out.
Cheat Code
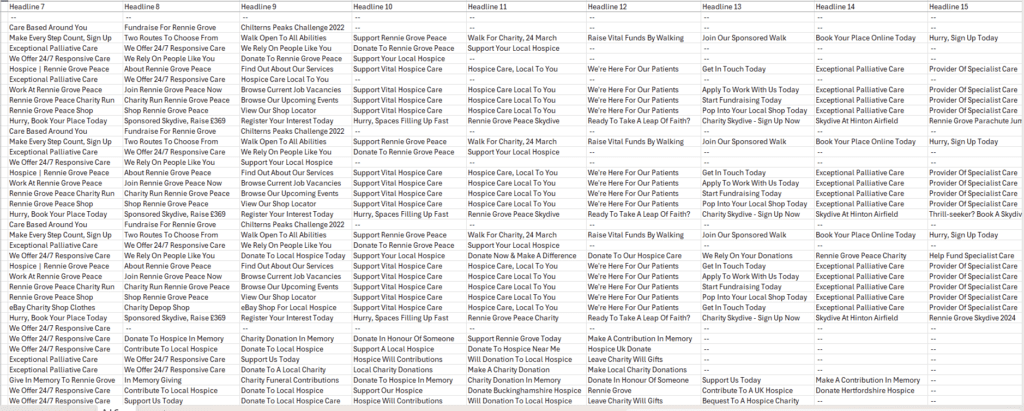
One way I found very useful to looking to see where I was missing headlines and descriptions was by downloading all your ads into an offline Excel sheet. By sorting by campaign and then ad-group, it was easy to sport where I was missing headlines and descriptions. Please see below a little example of a downloaded ads for a client.

Settings
LOCATION
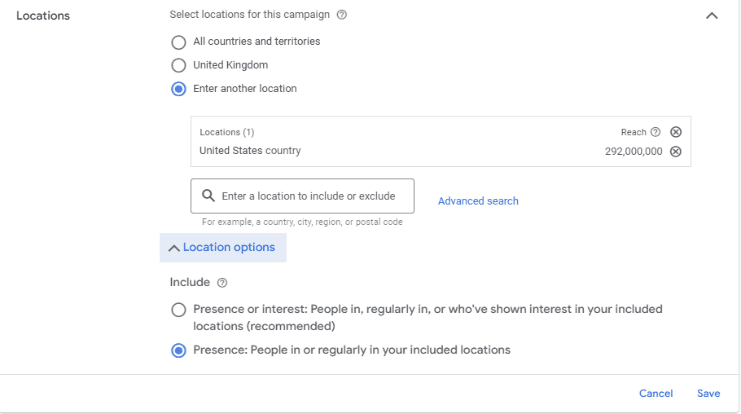
When setting up a new campaign it is important to target a certain location to ensure you are reaching those that are in the certain area as they would be more likely to convert should they click through. Likewise, you should also be excluding areas that you don’t want your ads to be served. A common misconception is that this is all you must do. Whereas in fact, this is isn’t true. You must also make sure you have checked the extra locations settings to ensure you have ticked the right option.

It is important you have the option of just ‘presence’ (as ticked above). This will ensure that you are only targeting those who are in your area or are frequently in the area. So, in the example above, the ads will only serve to those who are currently in the USA or those who are regularly in the USA.
Should you tick the Google recommended option, this will allow your ad to be displayed to those who have an interest in the targeted area. For example, should someone in Germany frequently show interest in USA, they will be served this ad. This helps contribute to wasteful spending, hindering performance.

As you can see, before when the location setting was on ‘presence and interest’, we could see the campaign spending in countries as far away as Australia and India. This is all wasteful spend that will contribute to the overall CPA and will almost never gain a conversion. Whereas after changing the location setting to ‘presence only’, all the spend is being funnelled into USA, the area where we want to be gaining conversions
LANGUAGE
Most people will often leave the language at the default English. However, this may not necessarily be correct in terms of a) the business and b) the location you are targeting.
Should you be targeting a highly diverse area (e.g. London or New York), there may be people who’s first language isn’t English, and therefore may not use English when on Google. It is good practice to change your language settings from English to All Languages. This will mean that if they are searching in Spanish, your ad will still be served, allowing you can access more people within that location and in theory generate more conversions.
ENHANCED CONVERSIONS
What are enhanced conversions? Well without going into too much Google detail, this setting simply allows you to follow the user around should they click decline cookies. This will only happen if they are logged into a Google account.
This means that should they convert, you can gain that conversion within the Google Ads interface, and you can collect data that would have otherwise been lost. This will then in turn help you to optimise the account more accurately improving overall account performance. For more information regarding enhance conversions, please see the Google Ads Help page: https://support.google.com/google-ads/answer/9888656?hl=en-GB
Cheat Code
Instead of going campaign by campaign and clicking into the settings to check all of this, which can be very time consuming, and let’s be honest, pretty boring. Google has now set up a new group of options for your columns in the Google Ads interface. Below is a screenshot of the options they have that are available. By adding these in, you can see what the settings are with just a quick 5-minute scroll. Then all you need to do is adjust the settings accordingly.

Conclusion
You have finally made it to the end, and congratulations. You now have these PPC Brilliant Basics that you can now implement into your own accounts to improve performance. You are now one step closer to become an even better account manager.

